brief
The clients were looking for a high-end kitchen within a tight budget. The property, a category B listed 3-story Georgian townhouse in Aberdeen, had a dated second-hand kitchen installed by previous owners. Although it functioned fine, its quirks and overall appearance detracted from the property's grandeur. The clients hoped that a large high-end kitchen would help sell the property in the future and compensate for the lack of built-in storage elsewhere in the home.
The clients provided a list of desires, influenced heavily by their previous kitchens:
White units
Clean & modern appearance
Easy to clean
Real stone worktops
Pull-out larders
A large amount of storage
Glass backsplash
Retaining existing floors, lights wiring and ceiling
Minimal disruption
Minimal open storage
Rationalise the various quirks within the room
We explored various precedents together to find elements the client liked and the overall impression we wanted for the kitchen.

As well as these listed brief items, I also tried to explore some important elements given the focus on resale value. I suggested a boiling water tap and clients seemed enthusiastic to get a combi-oven to aid the high-end appearance of the kitchen. I encouraged the client to embrace elements that will help keep the kitchen looking modern like matt black hardware, handless doors and agreeable unsaturated blue-green tones throughout.
Kitchen redesign
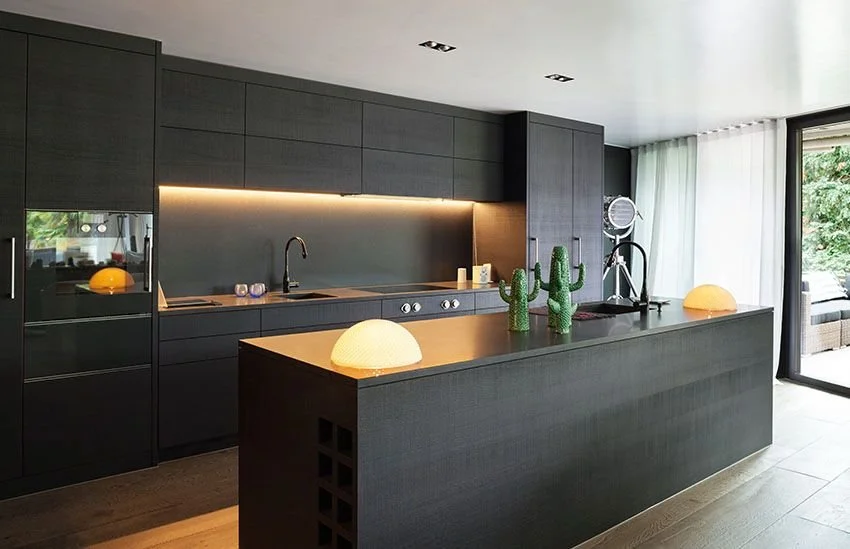
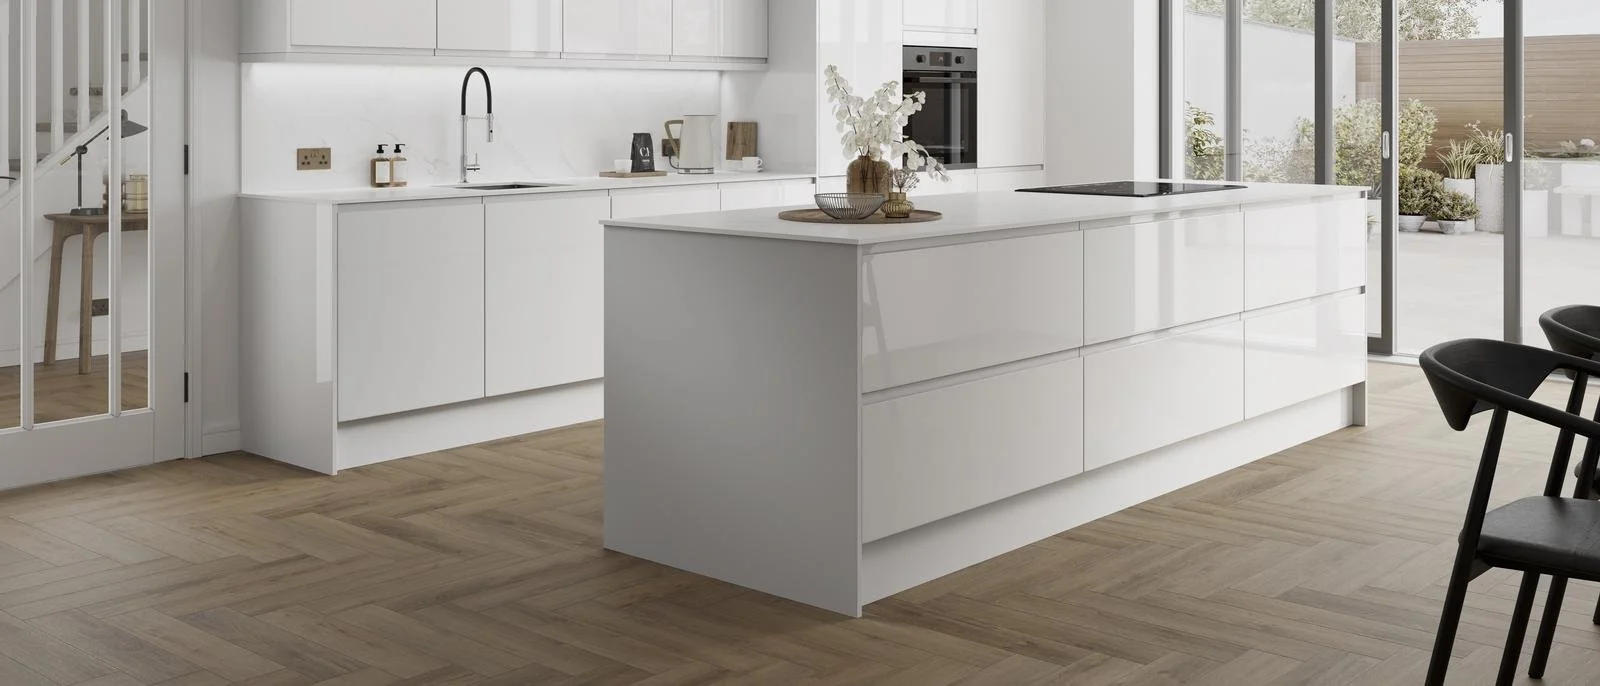
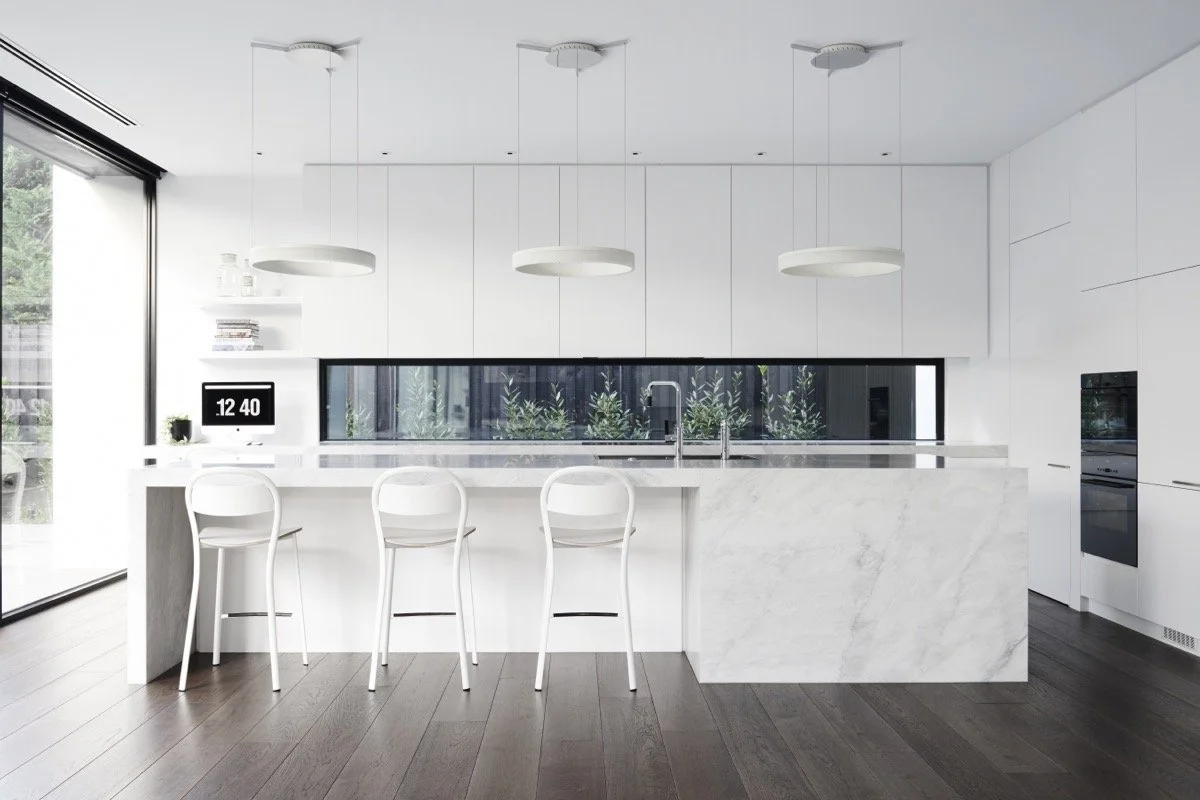
precedents
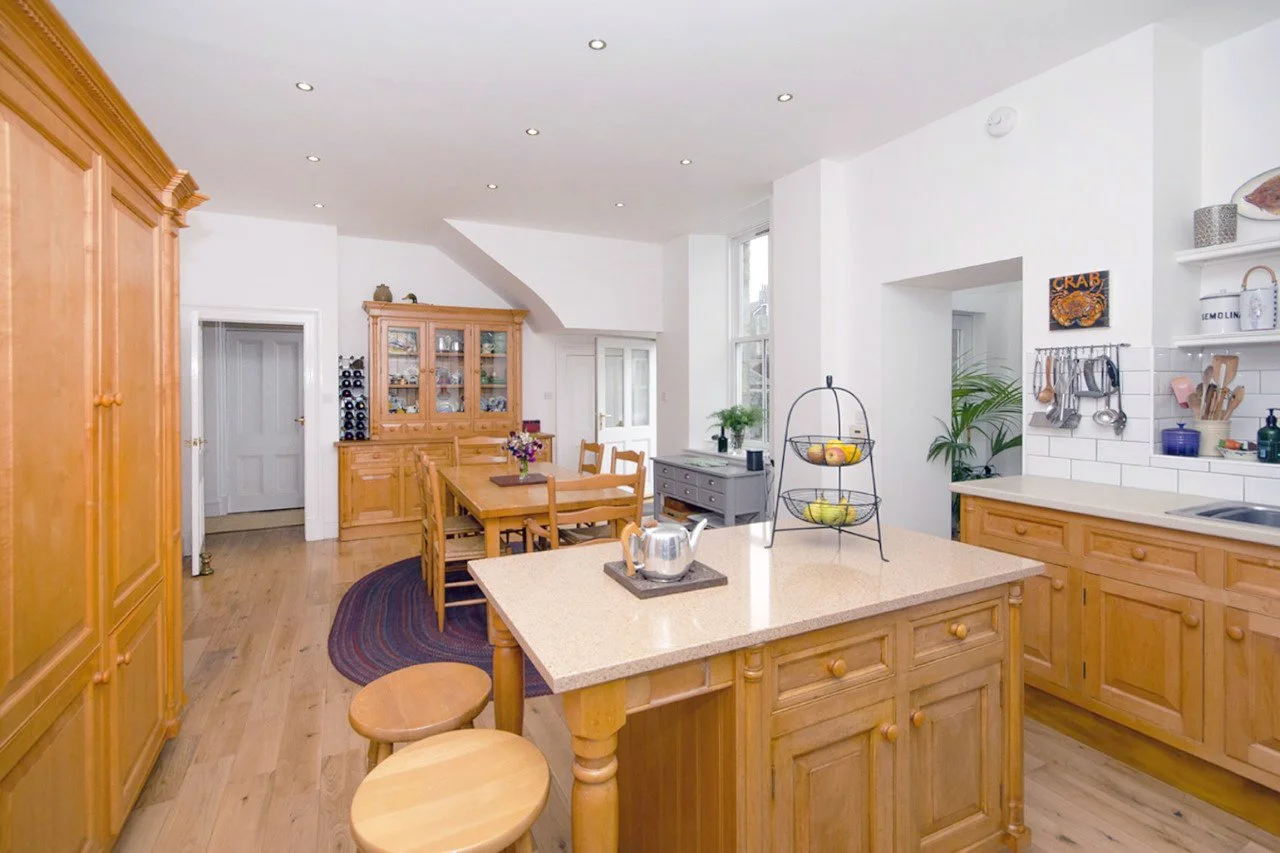
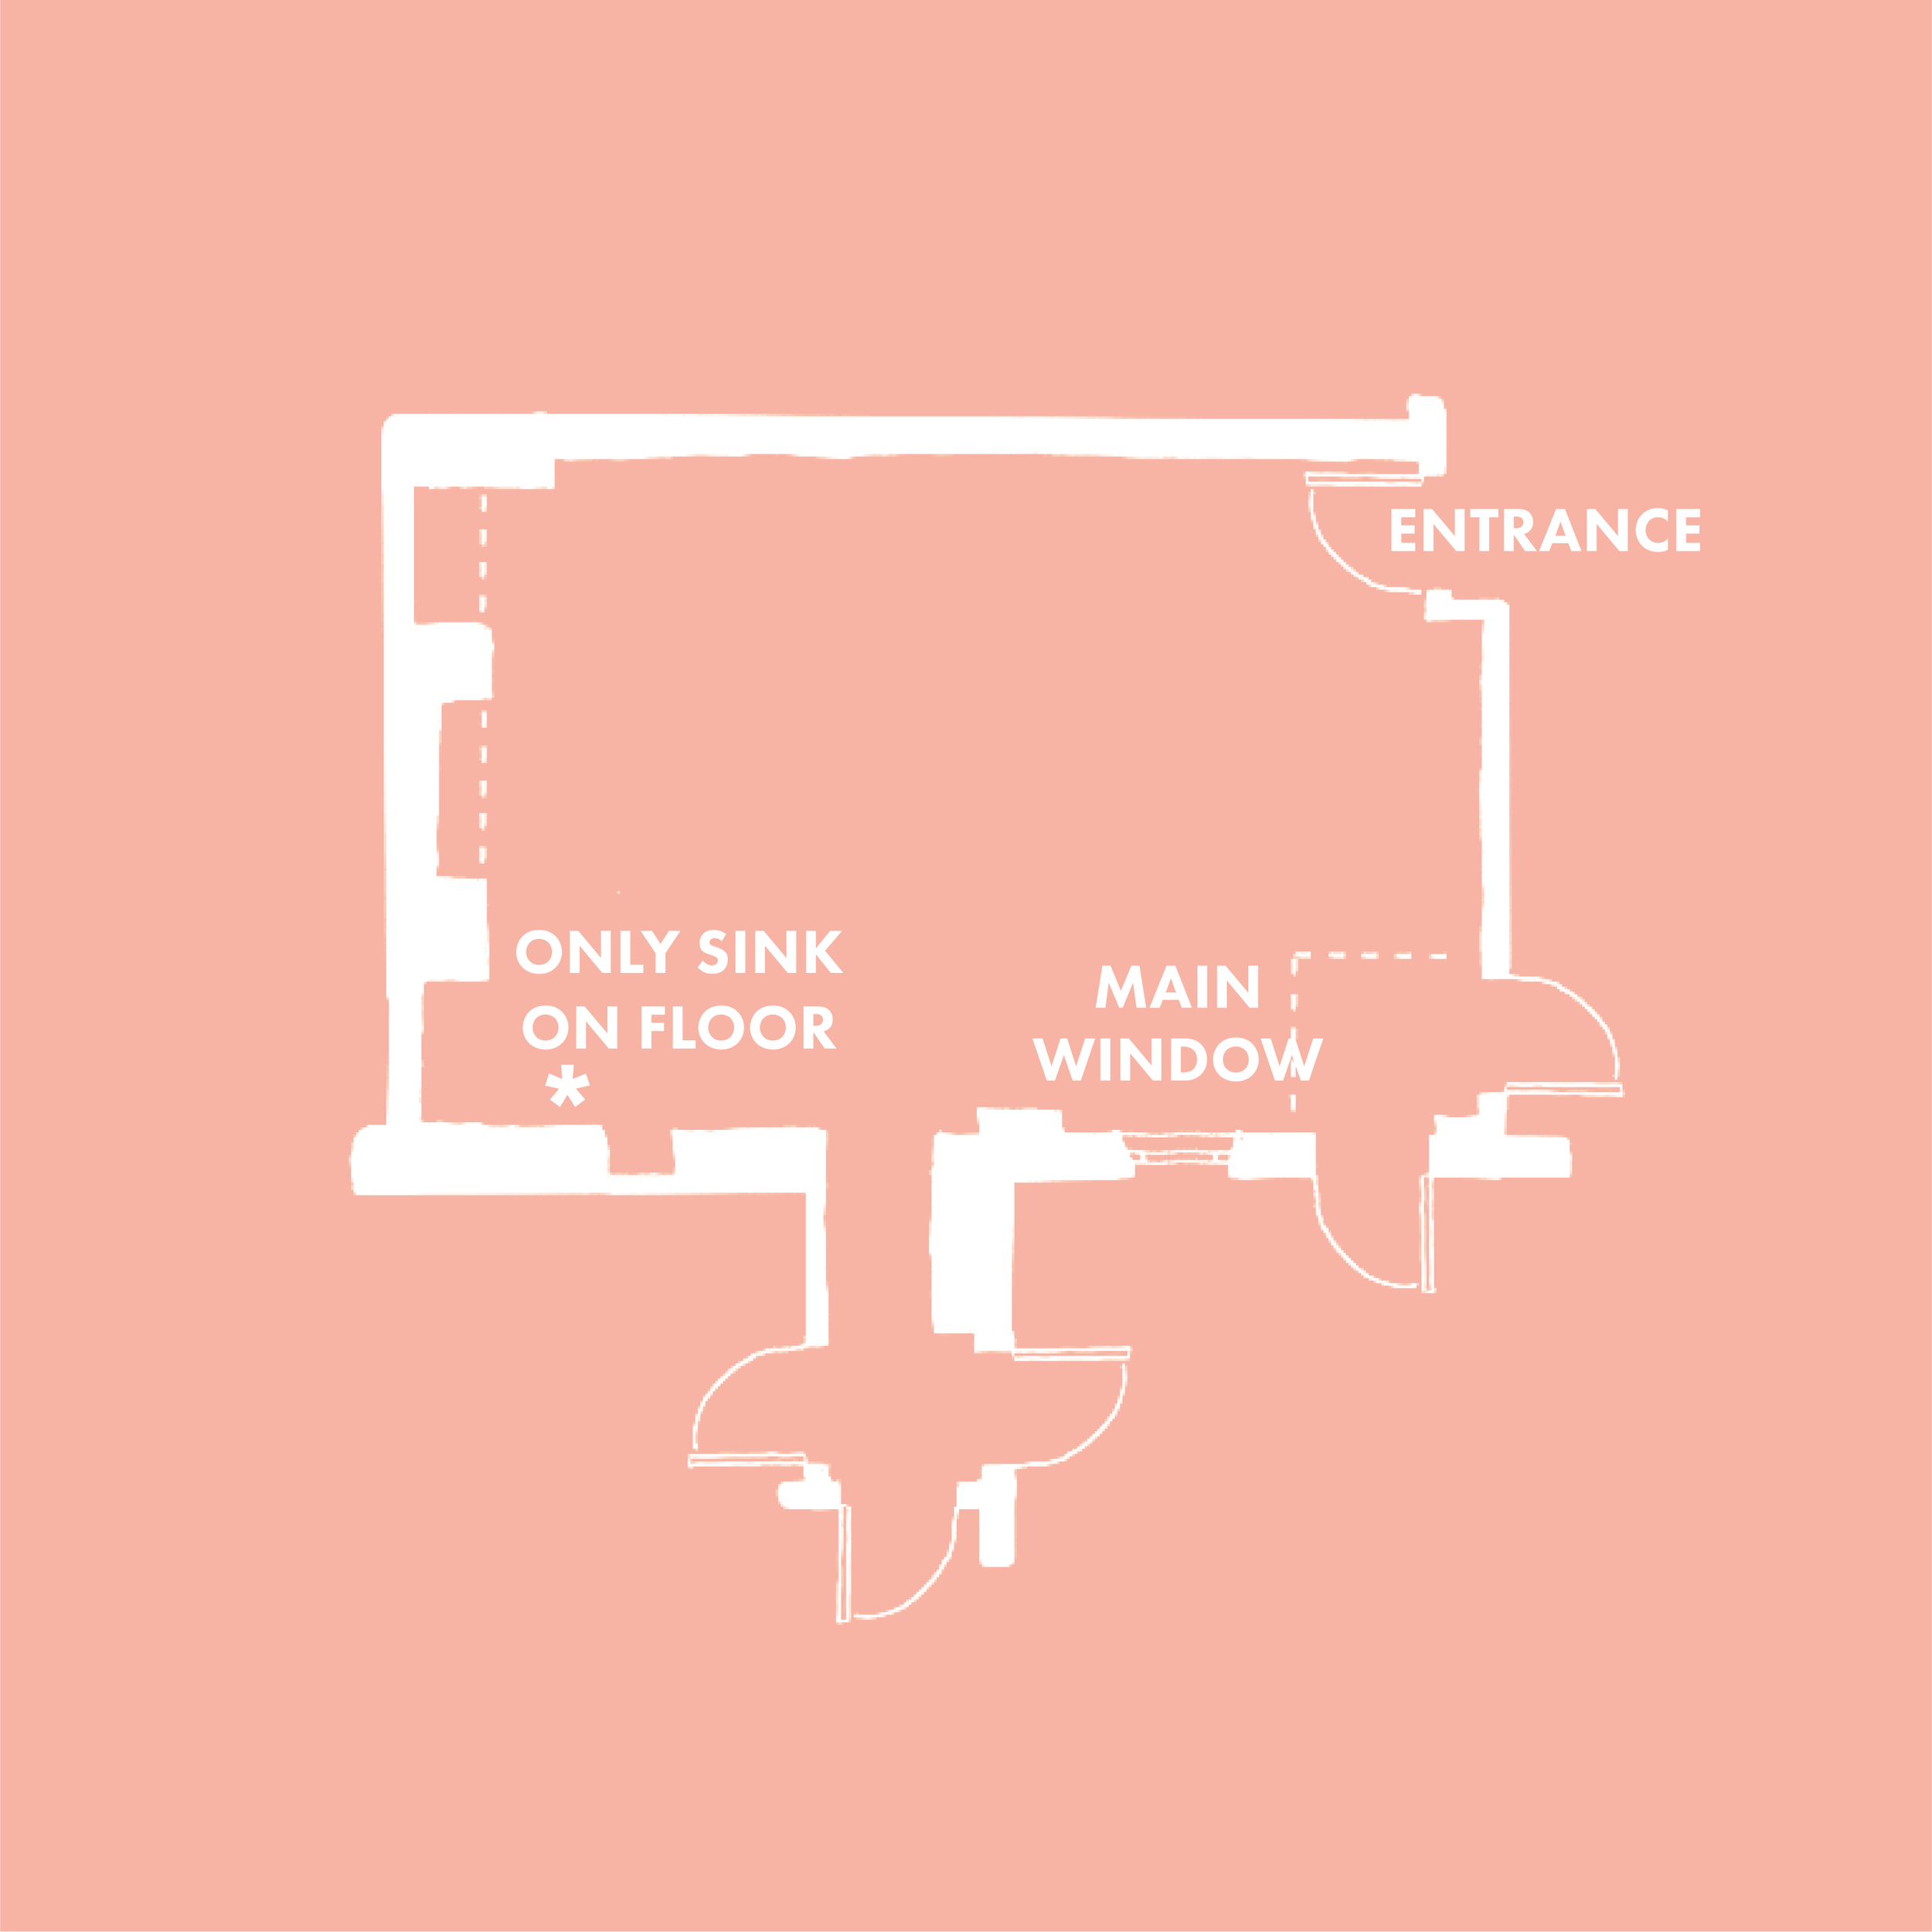
Initial Kitchen
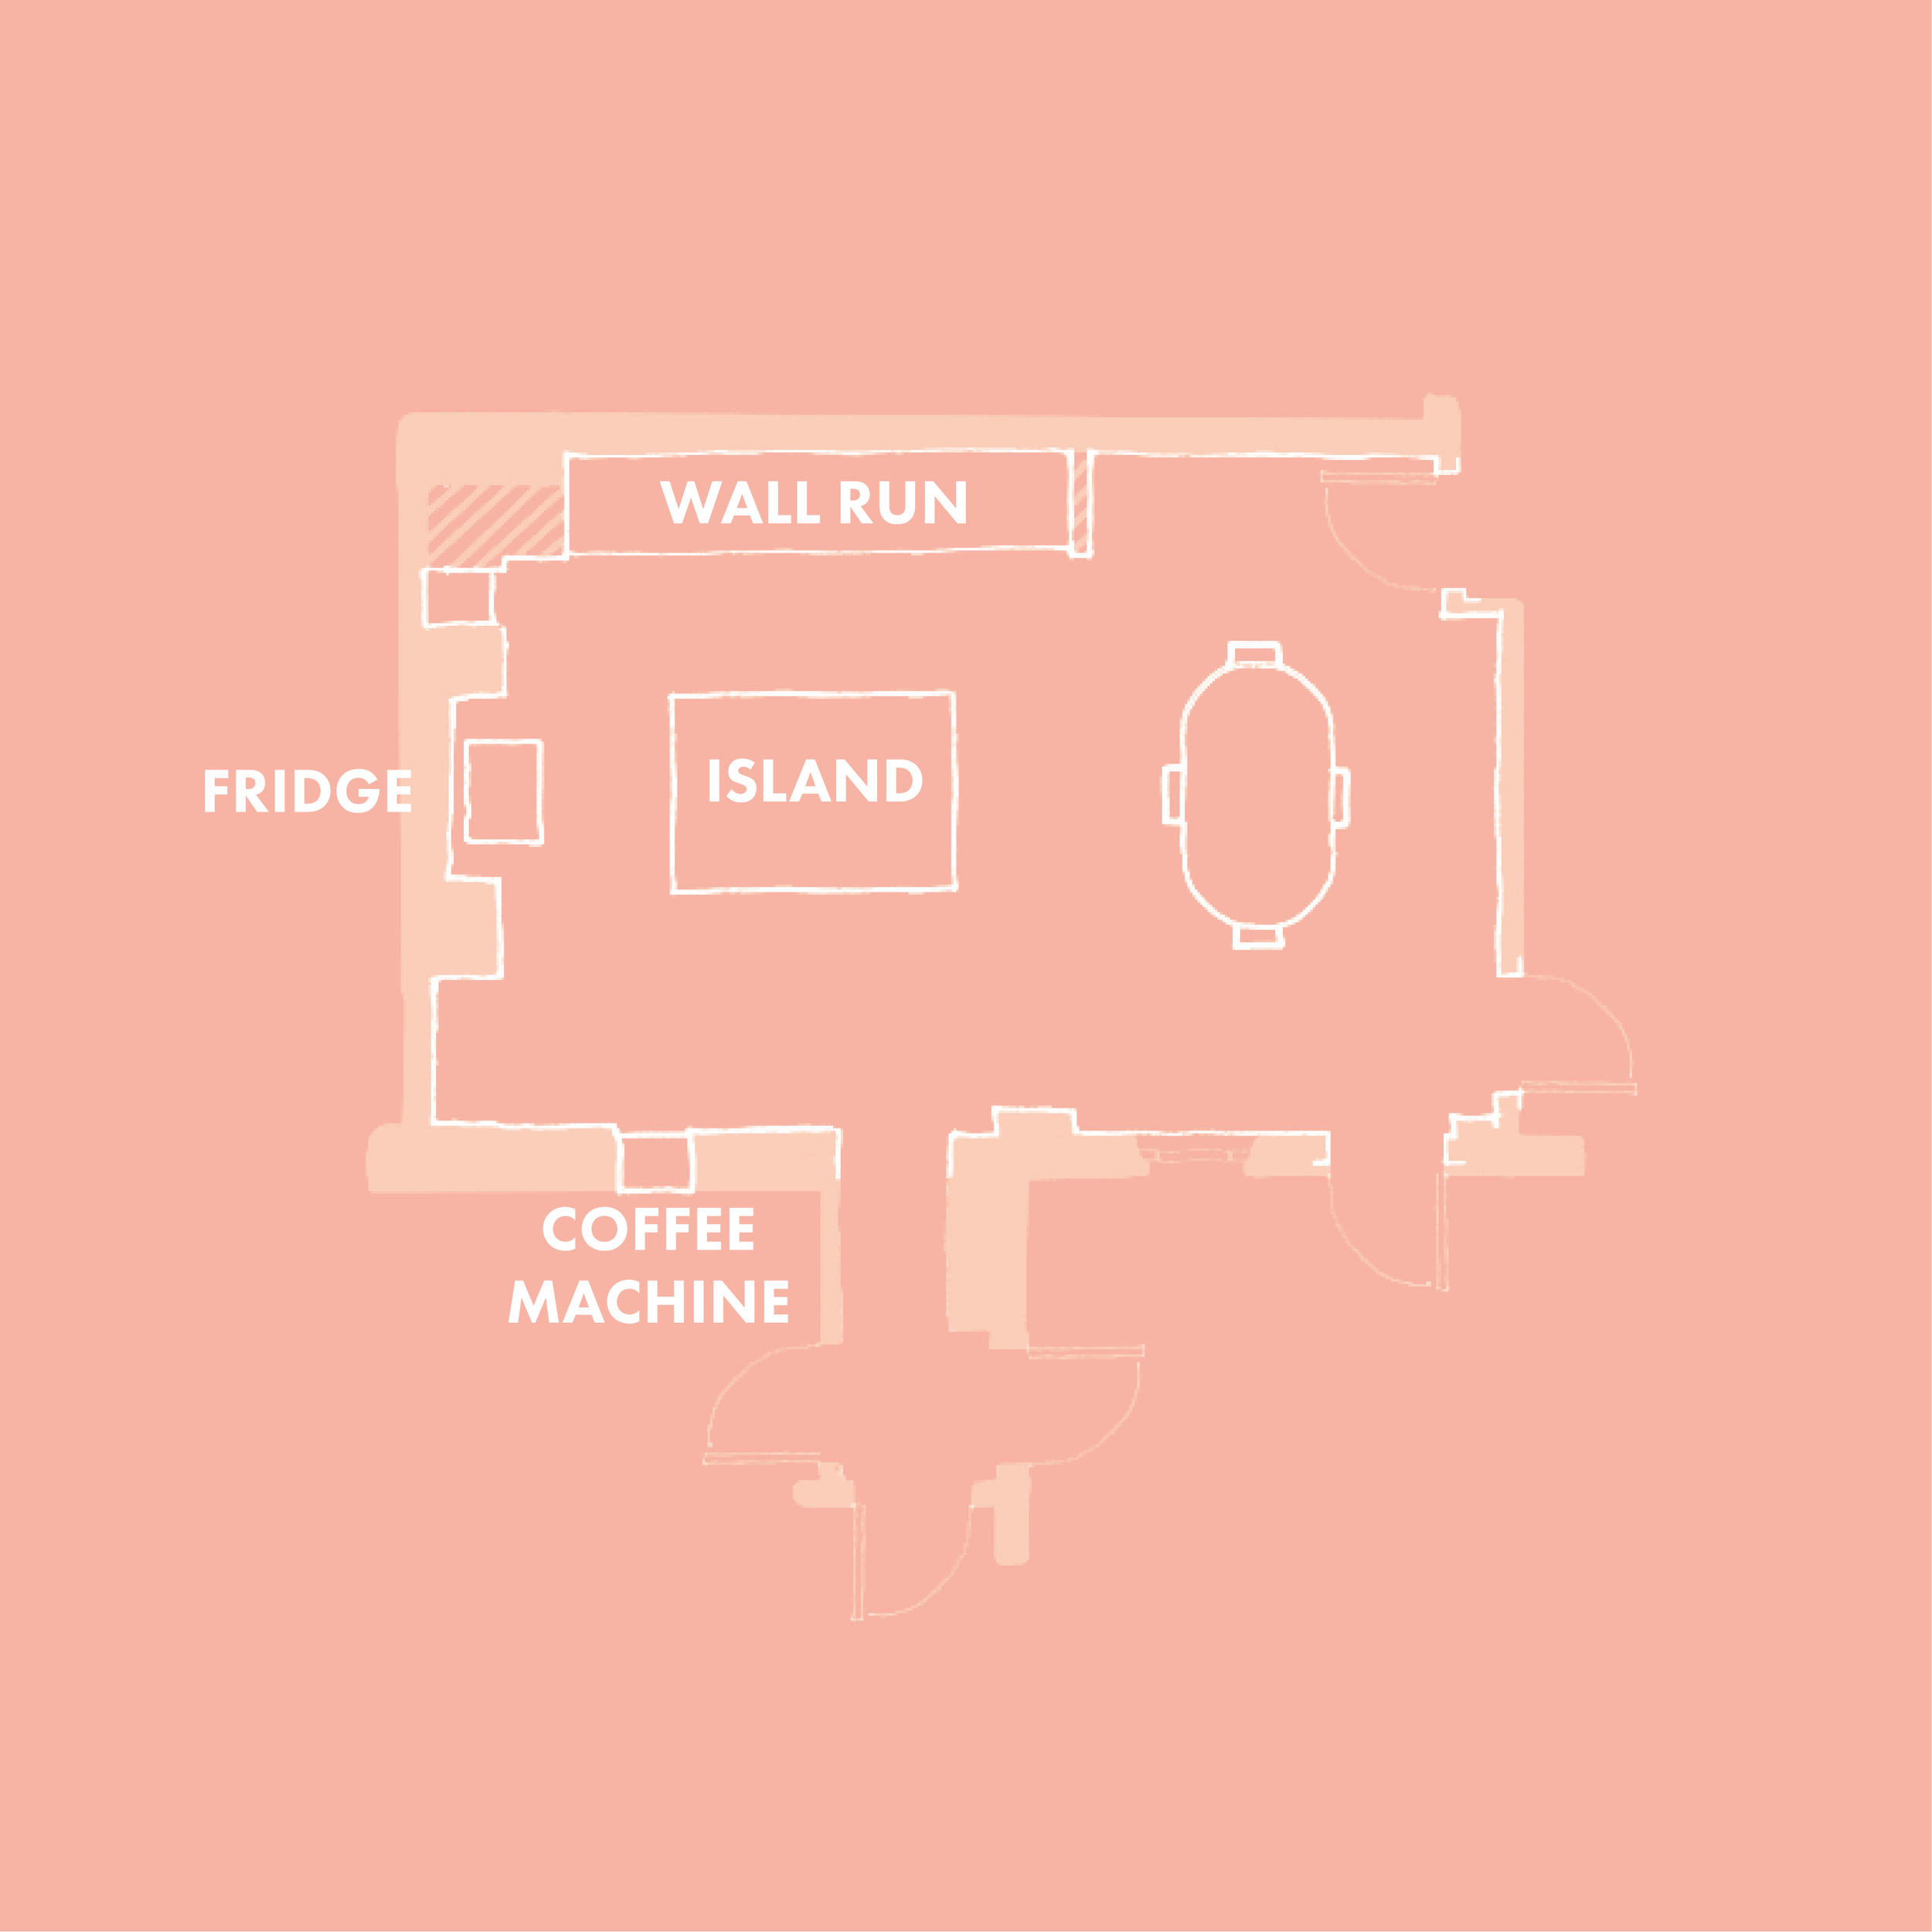
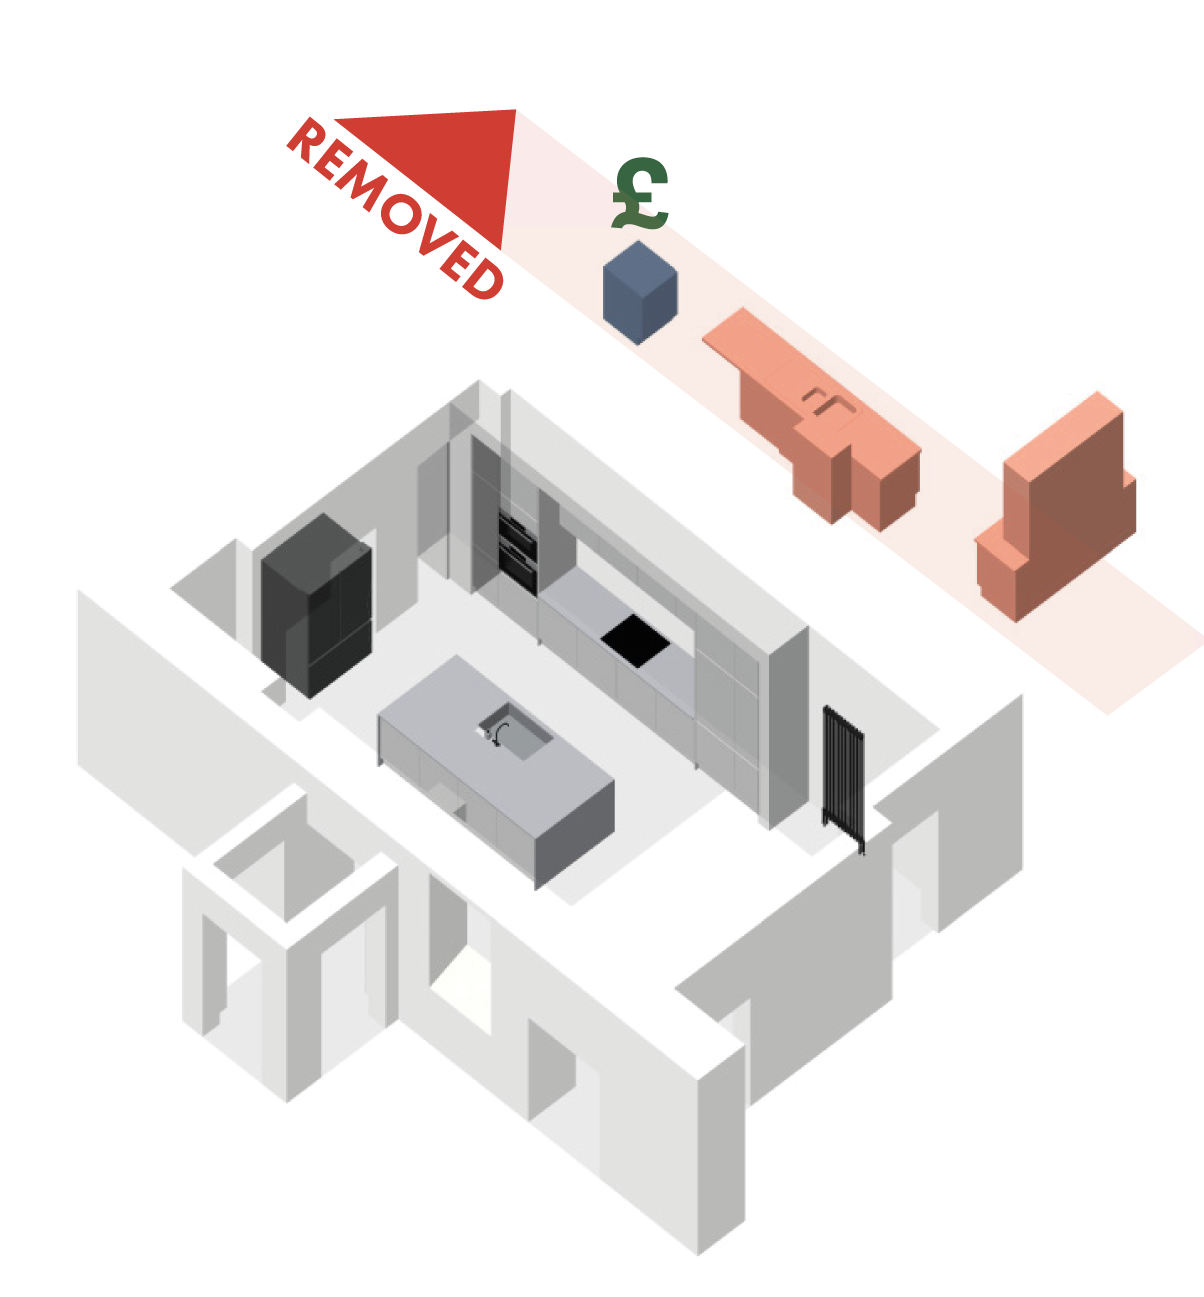
The existing kitchen was a combination of elements from a older American style kitchen and some early 2000s B&Q units. Although some effort had made to rationalise the these two kitchens the overall product was lacking. The solid wood construction doors and detailing was impressive but much it had warped internally and doors were difficult to open. The wood tone was dated and the kitchen appliances were mismatched and some in need of replacing. The range had no proper extraction and the exposed granite rubble to the gave off soot from when it was a fireplace. The sink was insufficient and was positioned at non-standard height. The island lacked any electrical sockets and had a different surface material to the small sink run - the island had a pink granite and the run was a cheap laminate. The kitchen had been a cause for hesitation for the clients when purchasing the property and they imagined that any future house hunters might fear the kind of work required to replace it
Concept
Existing room
Opportunities
Proposal
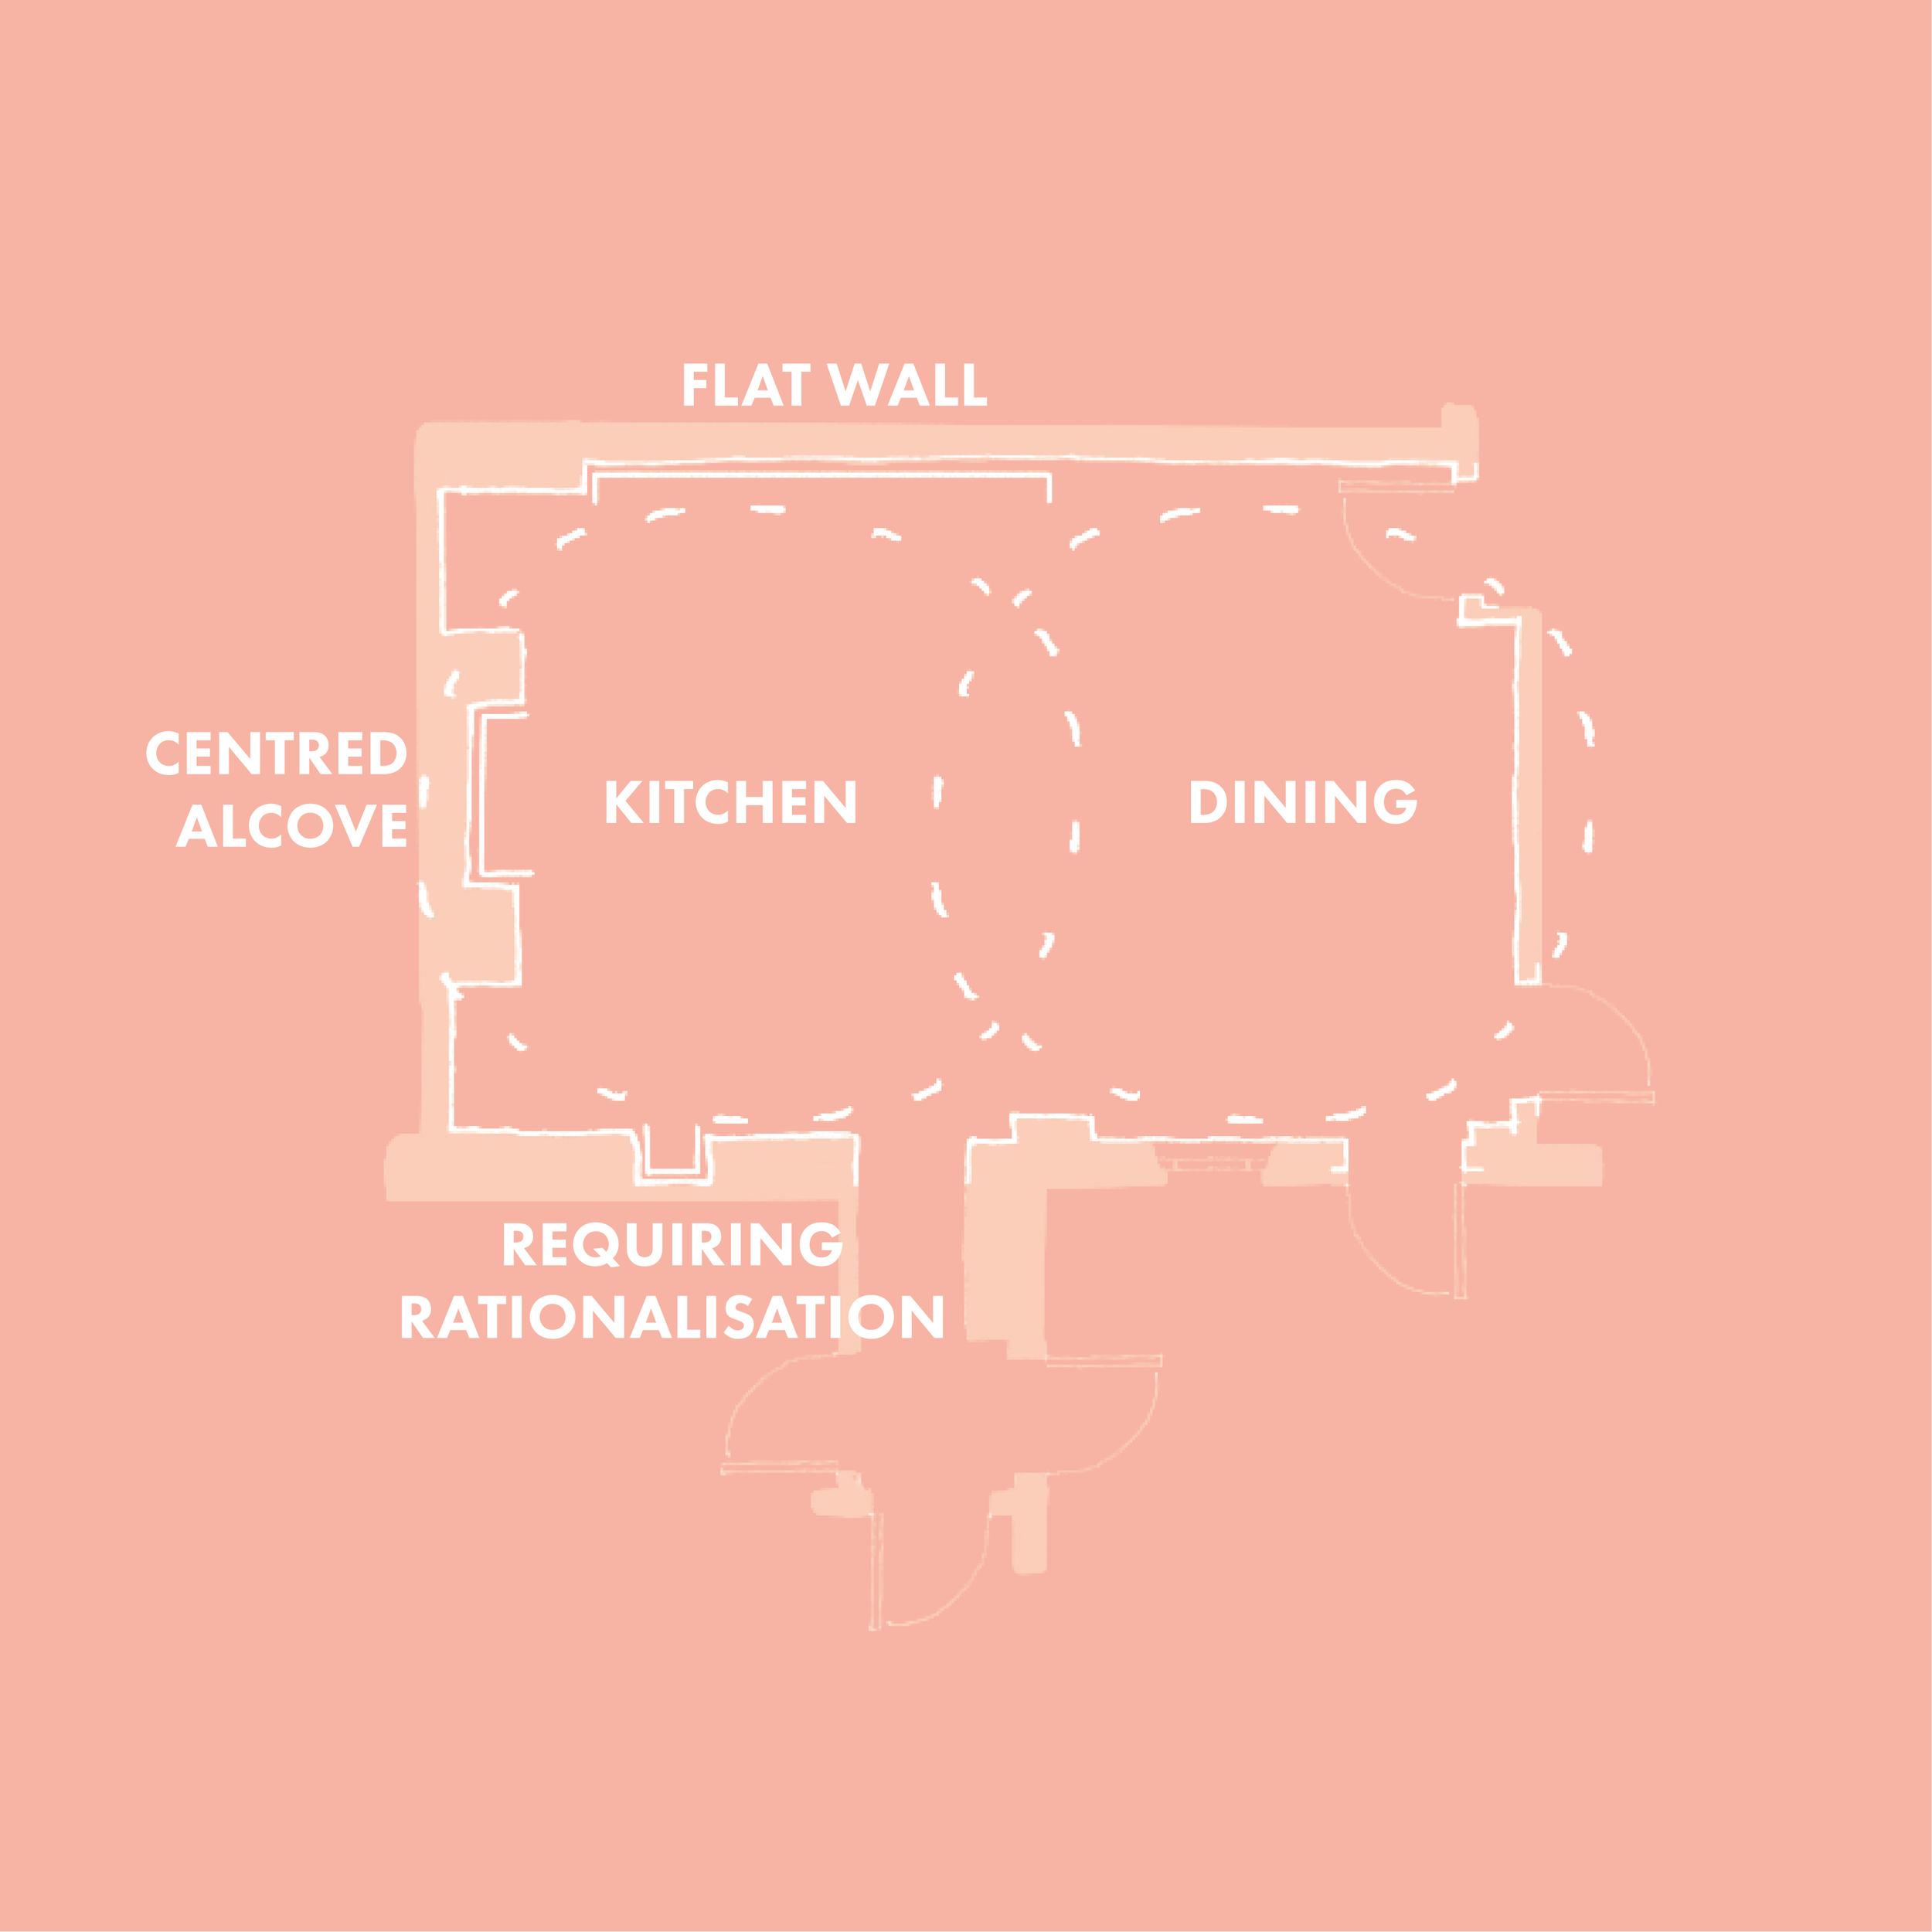
Proposal
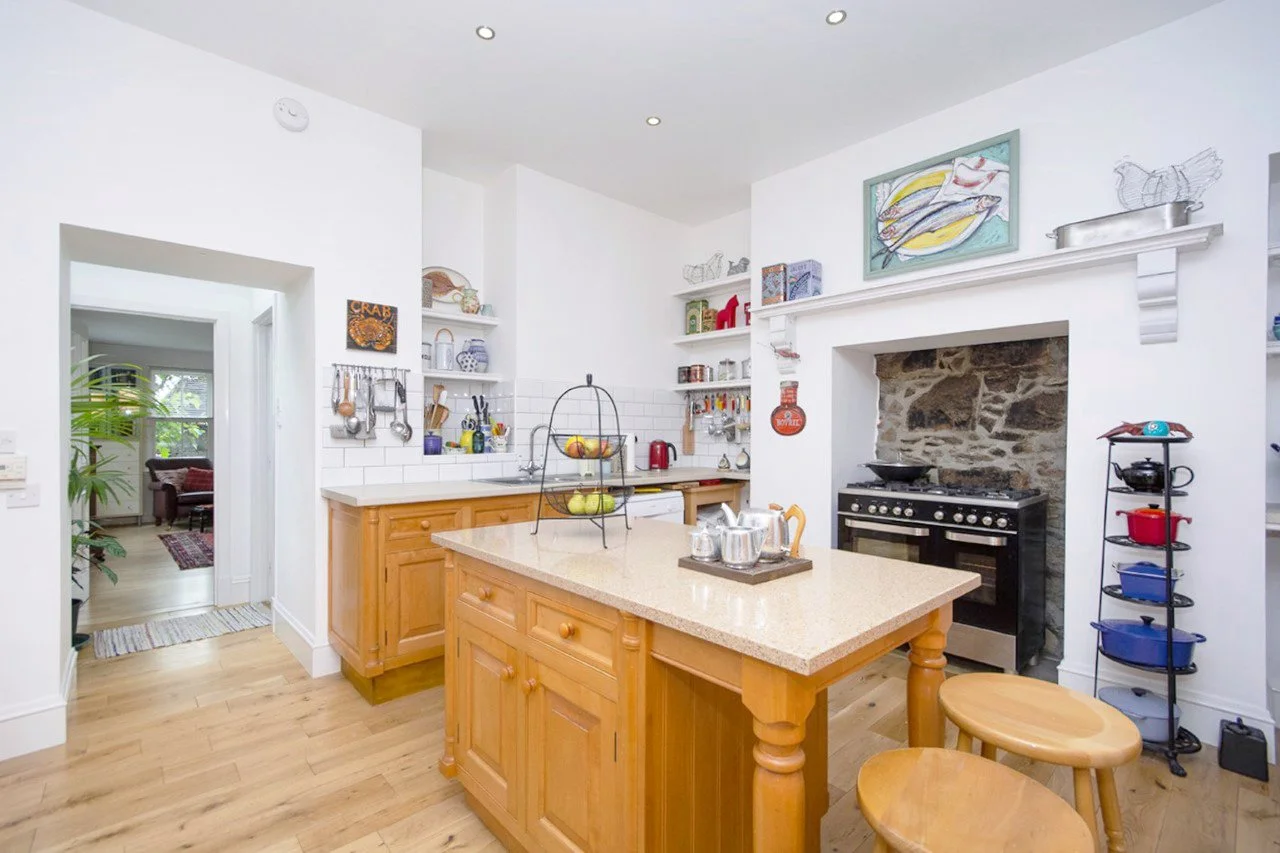
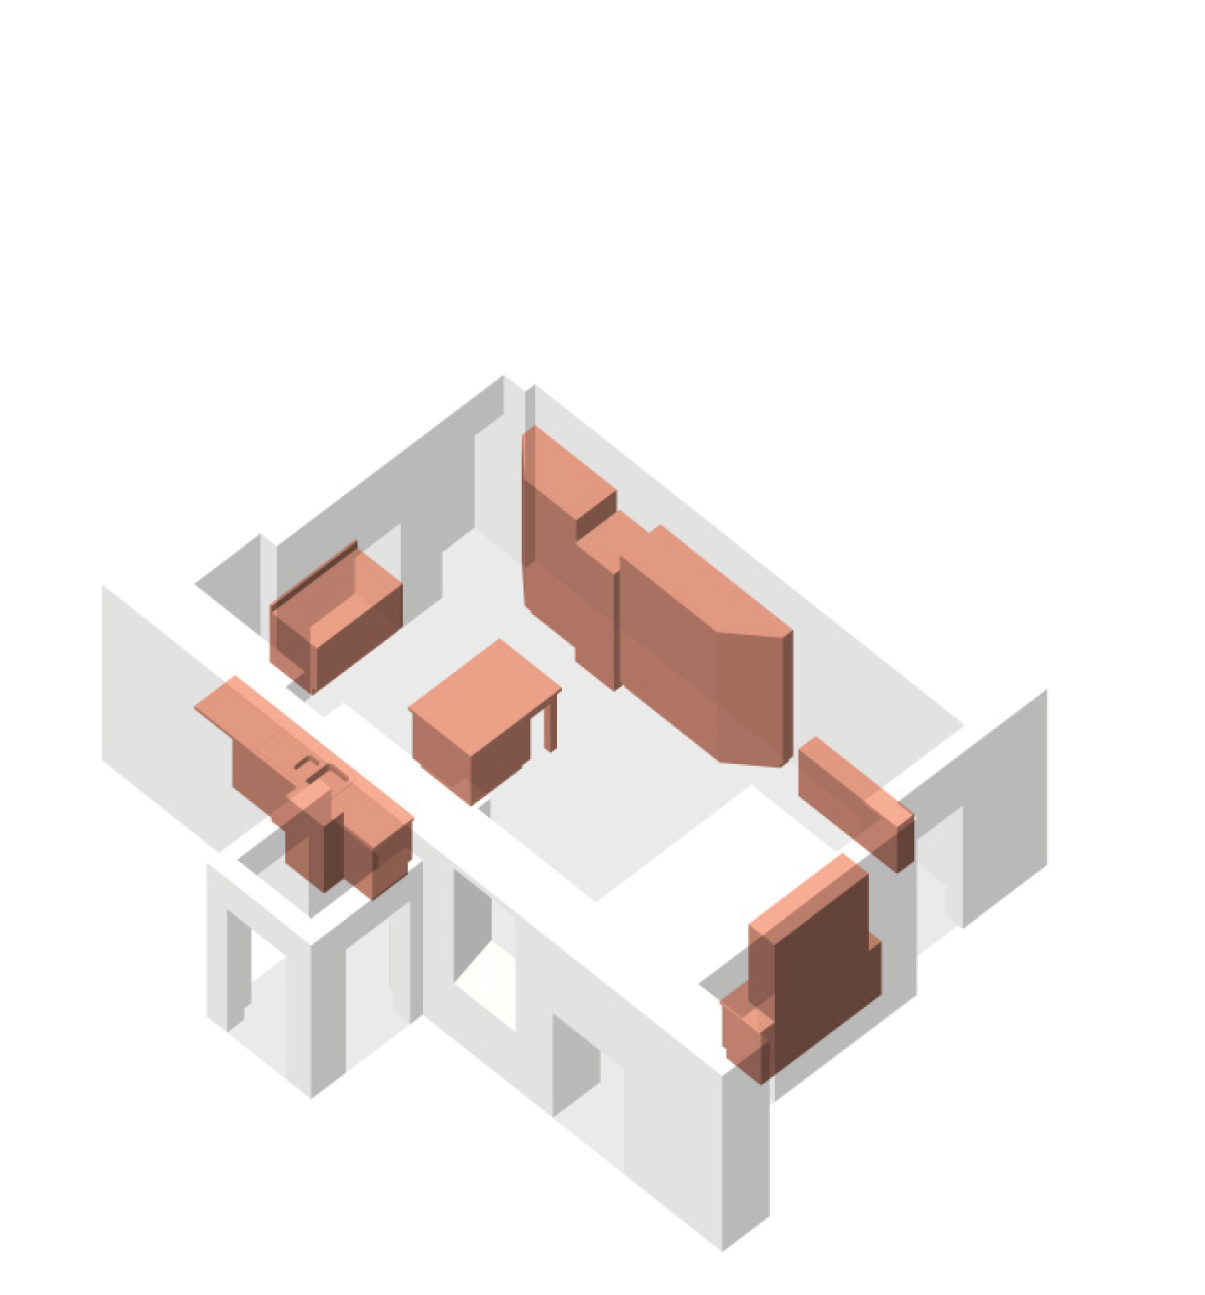
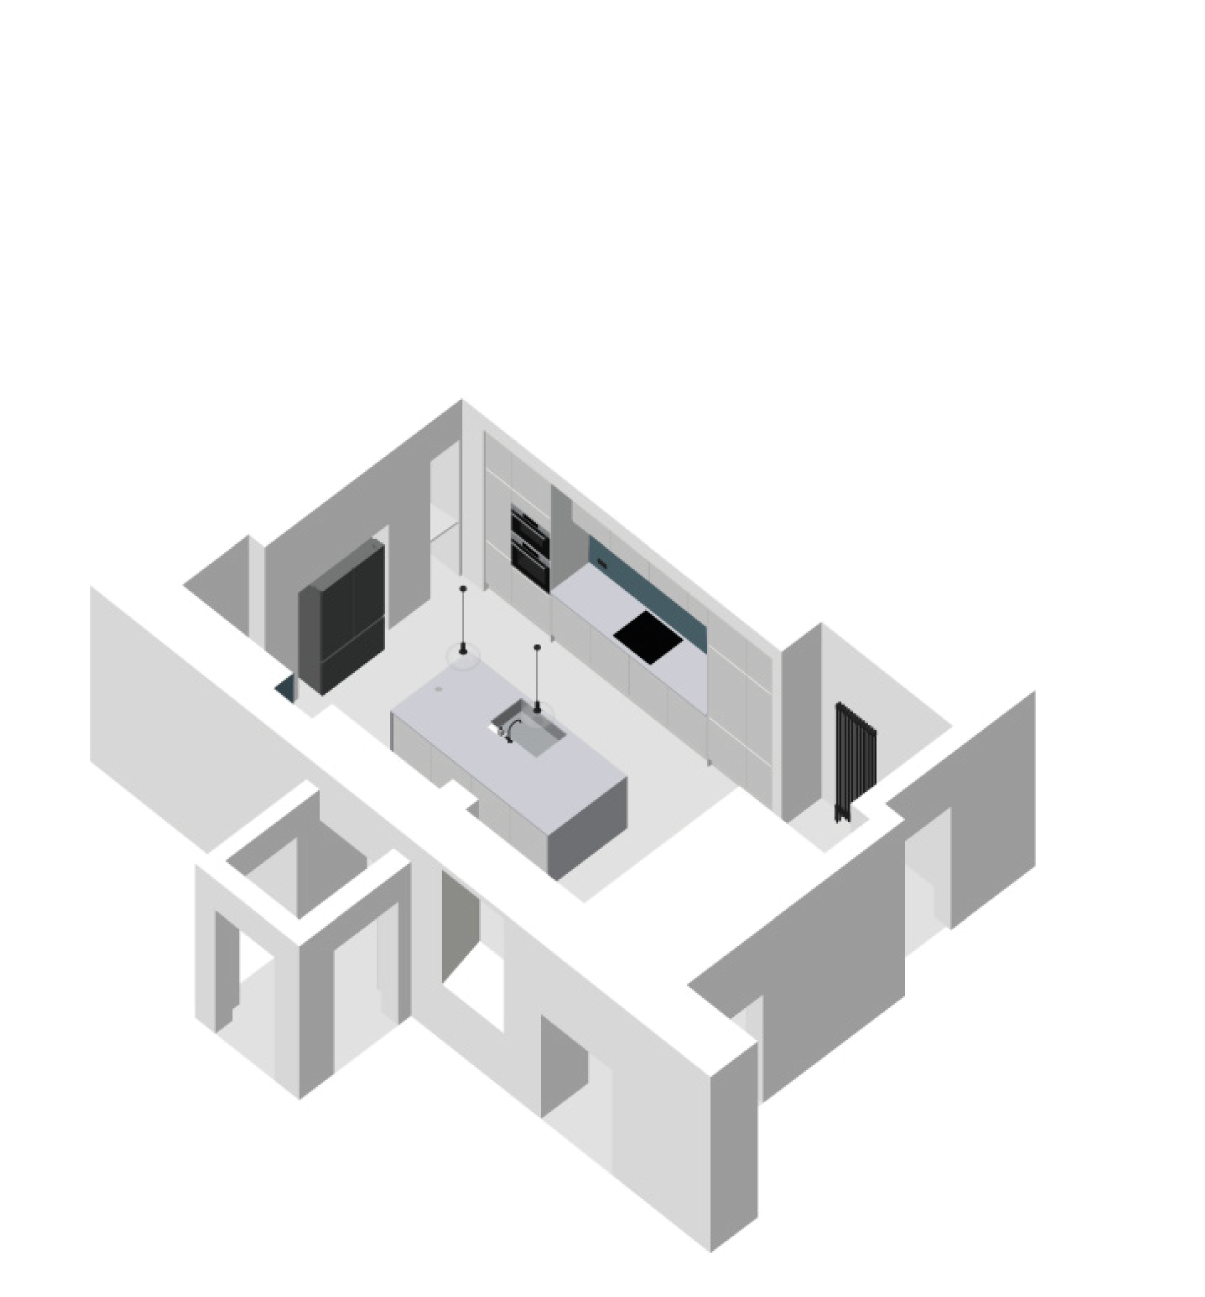
The proposal aimed to simplify the kitchen layout and achieve a custom built-in appearance to elevate the units. The proposal was split into 2 elements, a large island, and a run along the wall.
The island, proposed to be 1.2m x 2.4m would be significantly larger than the previous, would host the sink, a boiling water tap, the dishwasher as well as plenty of storage. One side consisted large pan drawers with hidden internal drawers for cutlery to reduce visual. The other side provides regular cupboards as well as a dishwasher and the equipment for boiling water tap. The sink selected carefully to be as big as possible as the unit could handle while maintain a functional, drawer. To provide power a small diameter pop-up socket was selected that allowed its body to fit within the service space between units and maintain cupboard integrity.
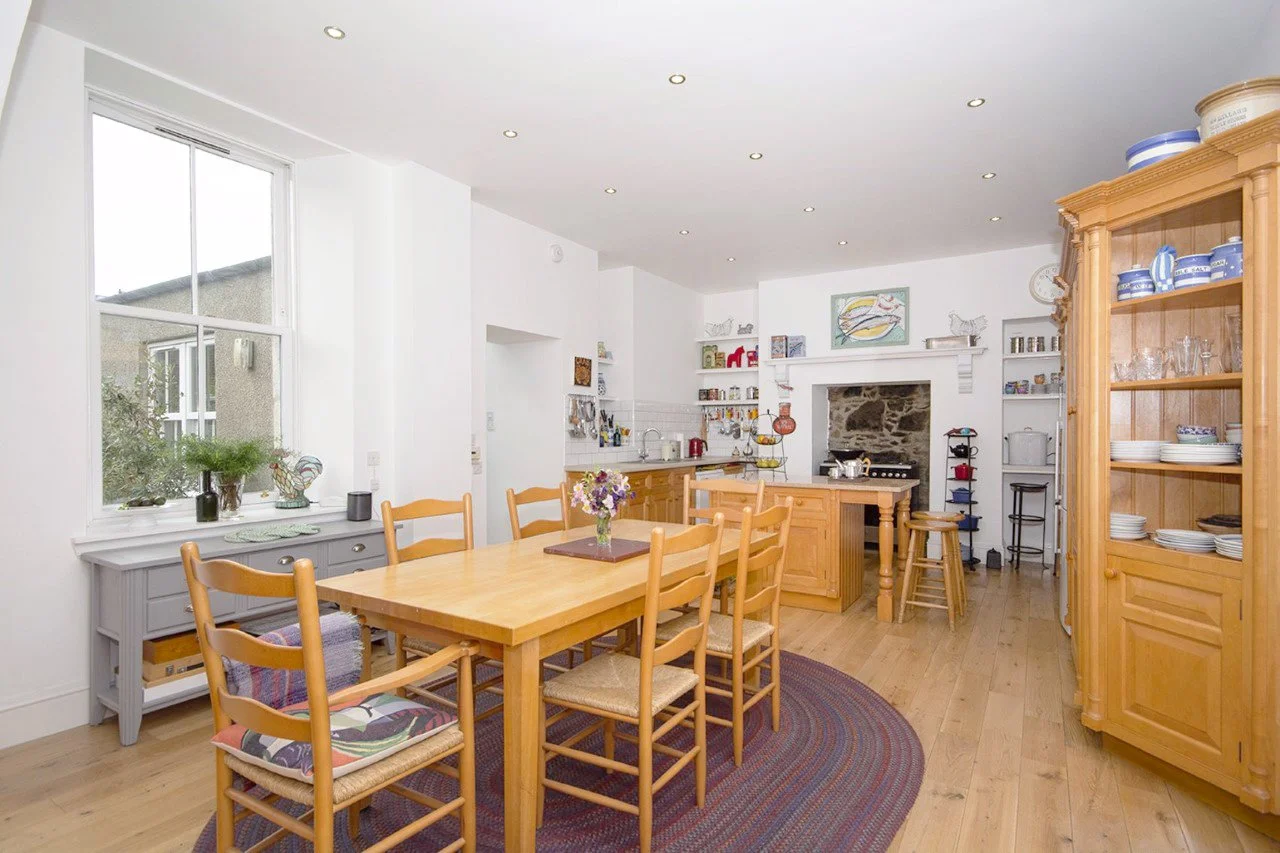
The run was proposed to host an induction hob, oven, combi microwave as well as 3 larger larders, regular cupboards, and high-level storage for less frequently used items. The higher ceiling provided the opportunity to go tall which I felt would solve various concerns of the clients while providing a higher-end appearance. I proposed reduced heights units would be flipped upside down to provide the upper storage on top of existing larders. This allowed larger wall units to be selected and positioned higher. The clients had concerns about any part of their kitchen feeling ‘claustrophobic’ and the larger space between the wall and floor units helped eliminate this fear. The space surrounding the run was boxed in and the surrounding alcoves rationalised to appear more intentional. To complete the built-in finish the space now framed by units on the wall would be filled by a blue backsplash.
The final elements started with the creation of a shelfing space to help mediate the different wall projections produced by the previous kitchen renovations. This provided a dedicated space for the coffee machine as well as a location for various pieces of decorative glassware. Within another alcove a shelf was created for the toaster, this meant the surface could remain uninterrupted when not in use. The fireplace alcove was reused for a French door fridge. Finally the fireplace was leaned against the wall in the enlarged dinning space.
Stages
Part of the design process was to create an easy set of steps to reduce the time the kitchen was inoperable. The actual kitchen replacement followed these steps broadly and although some things, like the surfaces, took longer than expected, these stages ensure the kitchen was usable throughout the renovation.
Current
Old appliances
Insufficient storage
Inconsistent and dated design
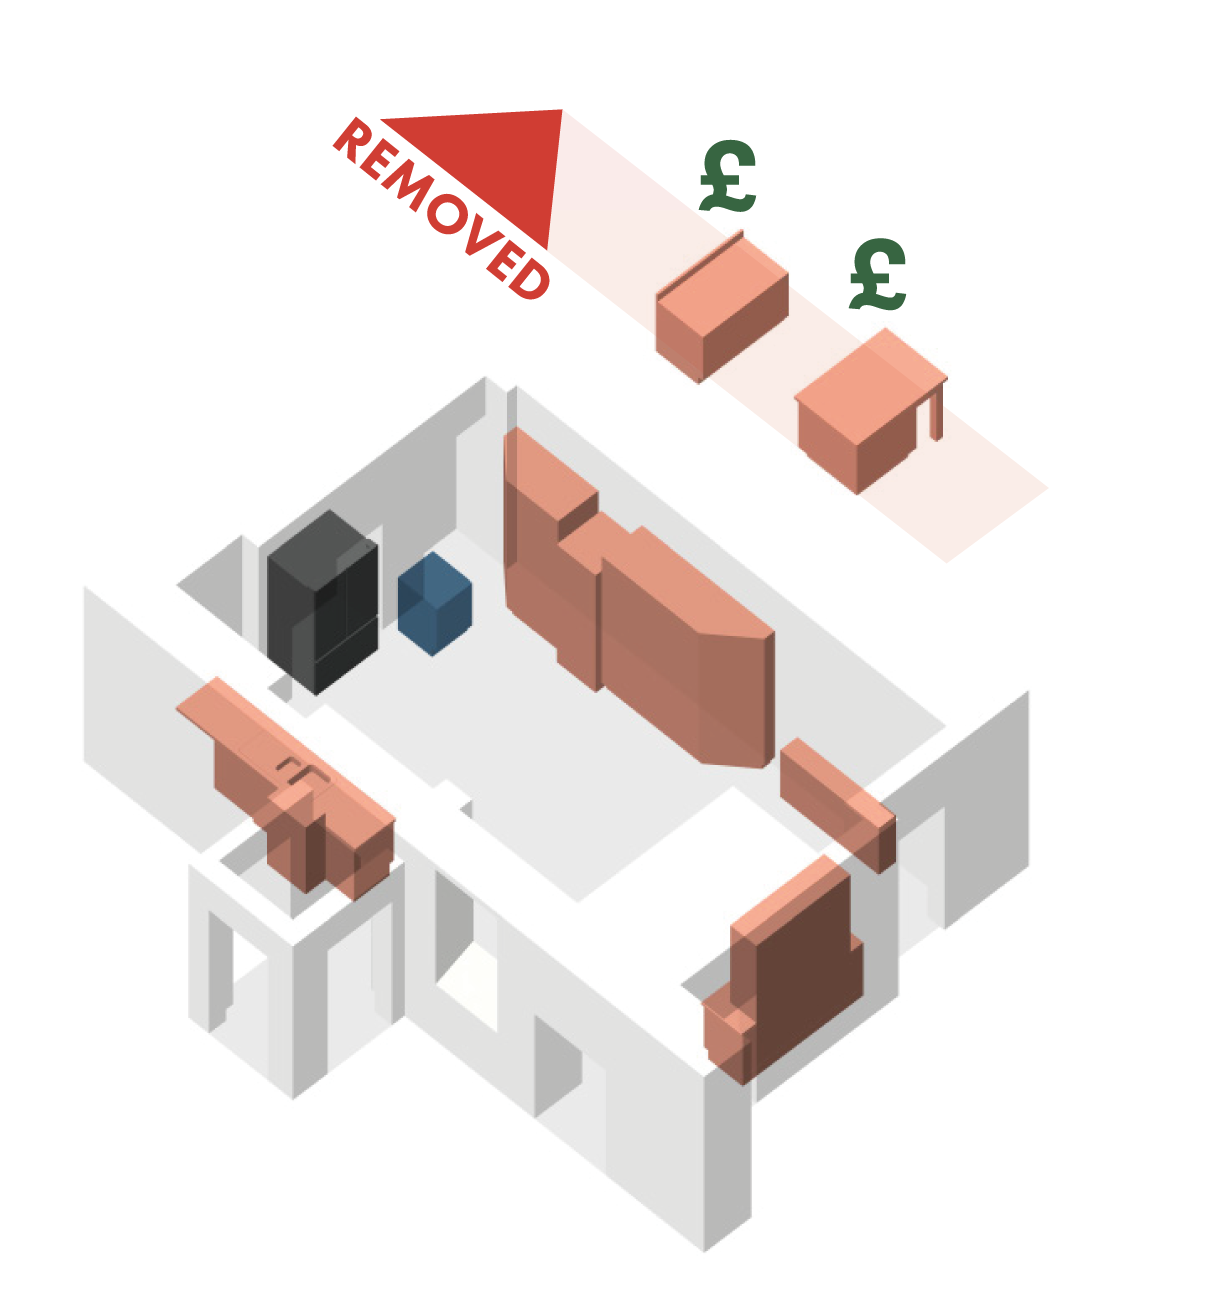
Stage 1
Old range sold
Temporary oven installed
Island and surface sold
Fridge installed in place of the range
Stage 2
Old fridge sold
Old radiator sold
Tall units removed
New kitchen units installed
New radiator installed
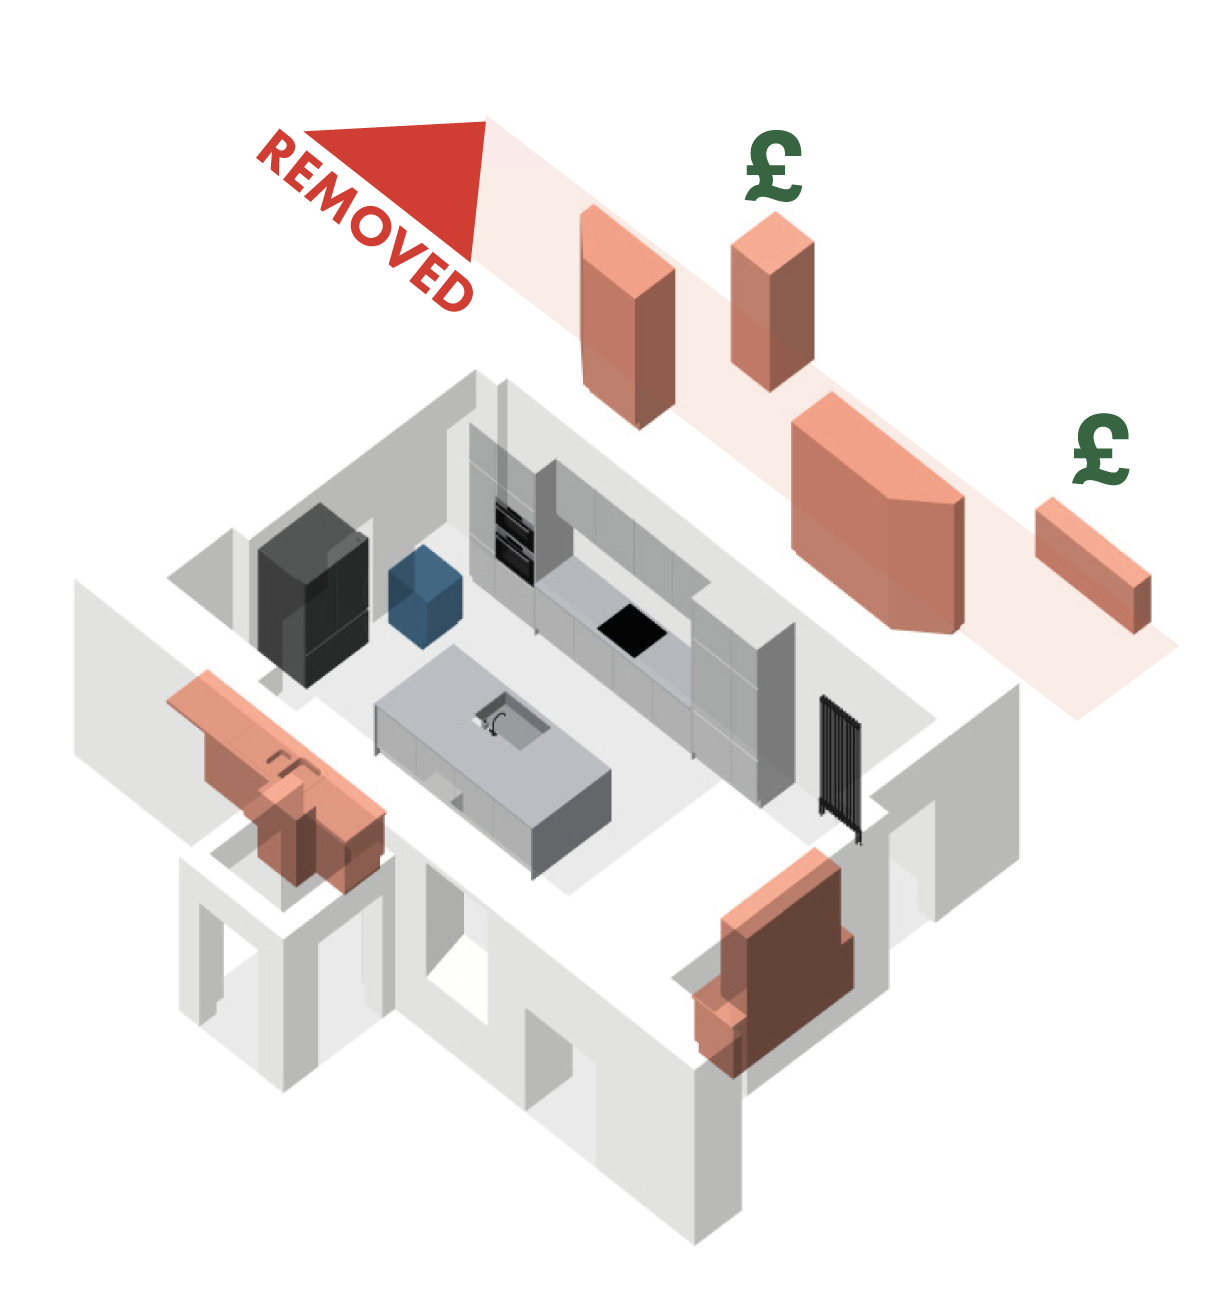
Stage 3
Old sink and dishwasher removed
Temporary oven sold
Remaining old storage removed
Boxing out created
Stage 4
Surfaces installed
Backsplash installed
Lights installed
Cost and Sourcing
As mentioned in the brief, an overarching objective was value for money and various decisions about the kitchen reflected this.
The first and largest decision resulting from this was the selection of a ‘DIY’ supplier for kitchen units. The supplier offered the best value for money with superior construction compared to their competition. I planned, selected, and produced a list of all the units required and to ease the process created an excel spreadsheet and accompanying diagrams to make the design clear.
The selection of appliances was also done to achieve high-end features at a reduced cost: the boiling water tap selected was one of the best at a lower price range; the combi-oven was sourced through a returns auction; the remaining appliances were selected to maintain a consistent appearance & brand but through various supplier to save money.
The room’s lighting had been split into two separate circuits with two separate switches. The new room layout made these zones obsolete. To avoid a rewiring that would require access to the space above the ceiling. I worked with the client to select an affordable smart light brand for the spotlights, pendant lights, and the backsplash strip lights. This allowed the client to control the lighting independent of the switches and in conjunction with the strip lighting. The result was cheaper than hiring an electrician for the rewire but added full RGB colour options as well as dynamic colour changing selections.
Other cost-cutting included the creation of the shelf space instead of going for full custom storage, the reuse of the current floor with a refinishing to it at later date and finding buyers for some of the old kitchen’s appliances and its island.
Decisions like these, as others allowed the proposed design to go ahead with only one major change, the dropping of the waterfall stone worktop edges. This change helped half the worktop cost and clients felt this was a worthwhile compromise.
Documentation
Throughout the progress, various documents and diagrams were produced to aid in the progress. Shown here is some of the documents I produced to aid in the purchase and tracking of units. It ensured we purchased all the right units and helped when the supplier delivered incorrect items and we had to respond quickly to ensure the kitchen delivery was not delayed.